Ansible for your Home Lab

Disaster struck in my home lab, again. This time I knocked a power cord loose on my USB power hub, taking down four of my Kubernetes nodes. That usually would not have been a “disaster,” but it broke the “sudo” command, and you can’t maintain Ubuntu without the sudo command. Long story.
There are nine Raspberry Pis in my home lab that first ran Raspbian, then Ubuntu, and I rebuilt for other reasons along the way. I decided that rather than do yet another manual re-install, now is a good time to add some automation.

Ansible
Ansible is an open-source tool written in python, power shell, and ruby to provision infrastructure, networks, containers, security, cloud, and more. Terraform and Ansible are two of the tools used for creating infrastructure-as-code.
It is easy to get started with Ansible because there is nothing to install on the target systems. Simply install it on your computer and start automating. Redhat sells Ansible Tower for the enterprise, but it is not required to use Ansible. Check out How Ansible Works to learn more about Ansible.
I first used Ansible in 2016 when the startup where I worked migrated our DC/OS (Data Center Operating System) cluster from vSphere to the cloud. Our three-person team did a cloud bake-off to decide which cloud to use. I took GCP (Google Cloud Platform), which happened to have a DC/OS Ansible playbook. It made deploying DC/OS to GCP easy, so the team chose GCP.
Home Lab Ansible Playbook
Despite using Ansible off and on since 2016, I never needed to write my own playbooks. This home lab outage is my excuse to automate some tasks using Ansible. My previous post, Running Ubuntu on a Raspberry Pi Cluster, details the eight steps to set-up Ubuntu on a Raspberry Pi:
- Flash the drive with the Ubuntu server image.
- Add the ssh file.
- Change the password at the first login.
- Add the ssh key on the host as an authorized key.
- Update and upgrade the Ubuntu packages.
- Change the hostname.
- Add the hostname to the /etc/hosts file.
- Set the static IP address.
My Ansible playbook only handles the last four steps because I ran into a problem with step three, the first login’s mandatory password change. I found playbooks using the sshpass command to handle the initial password change, but I could not install sshpass on my Mac. Another long story. So, I still do step three manually, as well as step four, adding the SSH certificate to the host.
Inventory
Ansible needs an inventory of the target hosts for a playbook. I find the DHCP address of each new host as it boots using my network scanner software, then add the IP address to the list.
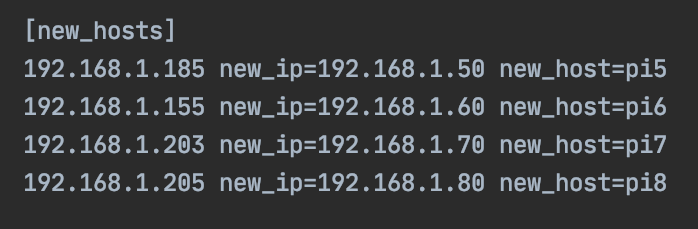
Each host in the inventory group gets a “new_ip” and “new_host” variable, that are passed into my Ansible playbook. In the image above, you see that the static IP address, 192.168.1.50, is given to the first host, and its hostname is pi5.
Ansible Playbooks
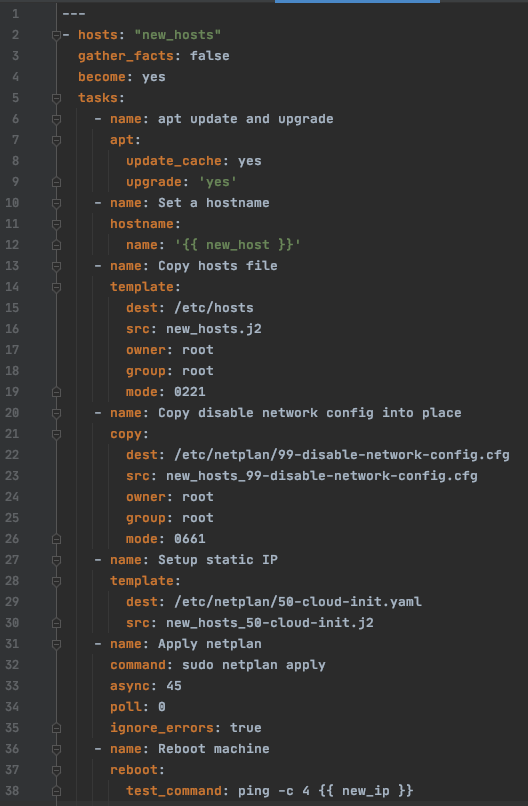
My playbook picks up after step four, automating setup steps five through eight. It does this using seven separate Ansible tasks. There are hundreds of pre-built Ansible modules available to use in your tasks, whether you need to copy a file, or deploy an application to the cloud. Checkout the Ansible Module index to see the complete list. These are the seven Ansible tasks in my playbook.
- Update Ubuntu.
- Change the hostname.
- Update the /etc/hosts file.
- Disable Netplan automatic configuration.
- Update the Netplan configuration with the static IP address.
- Apply the static IP Netplan configuration.
- Reboot the host.
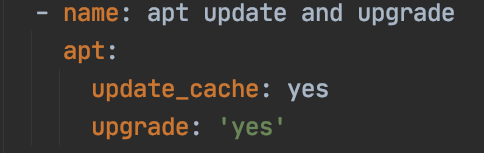
1) Update Ubuntu
First, make sure that Ubuntu is up-to-date.
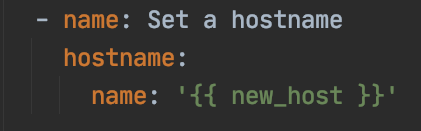
2) Change the Hostname
Change the hostname using the “new_host” variable specified in the inventory file.
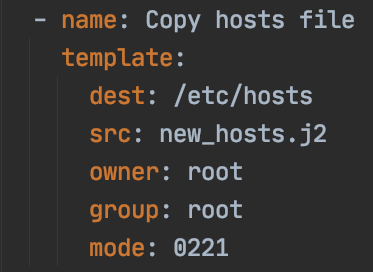
3) Replace the /etc/hosts file
Add the hostname specified in the “new_host” variable to the /etc/hosts file. The playbook uses Jinga2 to replace a variable in the template file created from the default /etc/hosts file.
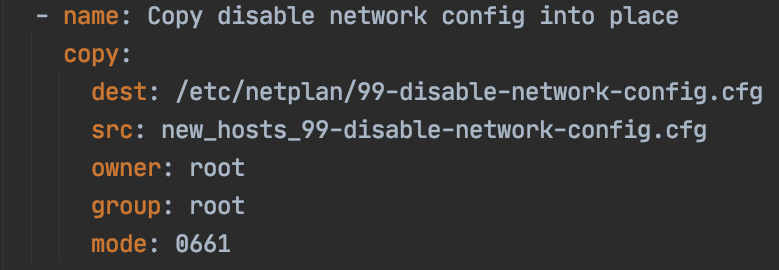
4) Disable Automatic Netplan Configuration
This task places a file in the /etc/netplan directory to disable the automatic generation of the Netplan configuration.
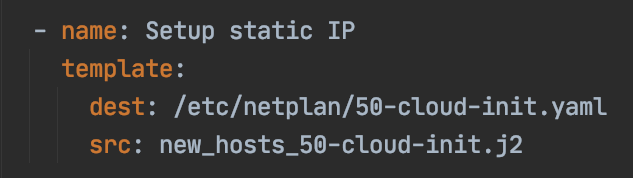
5) Add the Static IP Address to the Netplan Configuration
This task uses Jinja2 to replace the host IP in a Netplan configuration template with the “new_ip” variable from the Ansible host inventory.
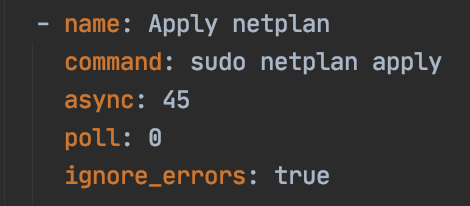
6) Apply the Netplan Configuration
The purpose of this task is to apply the network configuration. I should also add a step to generate and debug the format, but I didn’t find an example.
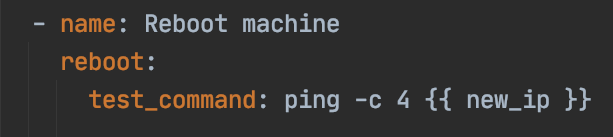
7) Reboot the Host
Finally, the Ansible playbook reboots the host.
Ansible didn’t save me time today since I was learning Ansible as I went, but now I have an automated playbook to save me time and avoid future mistakes. Here is the whole playbook:
Putting it all together
I modeled this project after Jakub Skałecki’s project in GitHub: github.com/Valian/ansible-multienv-base. With this layout.
1
2
3
4
5
6
7
8
9
10
11
12
13
14
15
16
17
|- hosts
|  |- shared-secrets.yml  # encrypted vars, used in all environments
|  |- shared-vars.yml     # not encrypted vars, used in all environments
|  |- prod                # directory for prod environment
|  |  |- inventory        # inventory file with definitions of all required hosts
|  |  |- secrets.yml      # encrpted vars for this environment
|  |  |- groups_vars
|  |     |- all.yml       # normal group_vars, like in typical ansible project
|  |- test                # directory for test environment
|     |- inventory
|     |- secrets.yml
|     |- groups_vars
|        |- all.yml
|- roles                  # all ansible roles used in playbooks
|  |- role1
|     |- ...
|- playbook1.yml          # here we put our playbooks
My new servers are setup in the /hosts/test/inventory file, and my playbooks are at the root of the project. From the root of the project I run this command to setup the new hosts:
1
ansible-playbook -i hosts/test/inventory setup_new_hosts.yml