DS/OS on Google Cloud Platform

My previous post discussed setting up your Google Cloud Platform account to run DC/OS. Now we move on to installing DC/OS. Before starting, if you are new to DC/OS, take a moment to familiarize yourself with DC/OS concepts. Also, look at The Mesosphere guide to getting started with DC/OS written about setting up DC/OS on AWS. Even though those instructions use shell scripts to generate the nodes, and the Google Cloud Platform project uses Ansible scripts, the concepts are the same.
Create the DC/OS Bootstrap Machine
The bootstrap machine is where DC/OS install artifacts are configured, built, and distributed. The instructions for Google Cloud Platform rely on Ansible scripts from a dcos-labs project on GitHub. At the time of this writing, the GCE set-up page in the DC/OS 1.8 Administrative guide was a little out of sync with the project README file, so I followed the GitHub README file instead. Start from the Google Cloud Platform dashboard. Make sure the Google Cloud Platform project that you created for DC/OS is selected. Click the “hamburger” menu icon in the upper left corner of the page and then choose Compute Engine from the menu. You need an “n1-standard-1” instance running Centos 7 with a 10 GB disk. Follow the README instructions carefully on how to configure this new VM instance.
Connecting to the DC/OS Bootstrap Instance
Once the DC/OS bootstrap instance starts, it will appear on the GCE VM Instance page with a green checkmark to the left of its name. To connect to the machine, either download the Cloud SDK to your desktop computer or activate Google Cloud Shell from the >_ icon toward the right side of the page header.
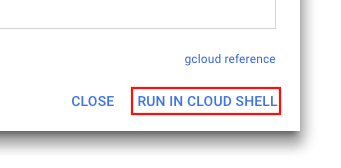
Cloud SDK runs in an f1-micro Google Compute Engine and displays a command prompt at the bottom of the page. Open the SSH drop-down list to the right of the bootstrap instance and pick View vcloud command. When the dialog opens, select RUN IN CLOUD SHELL (or use one of the other options to ssh into the bootstrap instance).
After connecting to the DC/OS Bootstrap instance, follow the instructions in the README file until you reach the “hosts” file… Ensure the IP address for master0 in ./hosts is the next consecutive IP from bootstrap_public_ip.
Defining the Master Node(s)
The number of master nodes is permanent, so if you change your mind, you must reinstall the cluster. It takes a quorum to determine its leader, so choose an odd number of nodes to avoid a “split-brain” situation. It is common to use three master nodes; however, GCP only allows eight CPUs if you are using the Google Cloud Platform free trial. I tested with a single 2-CPU master node, two 2-CPU private agent nodes, and one 2-CPU public agent node. The “hosts” file defines the number of master nodes in the DC/OS cluster. The master nodes’ IP addresses should be contiguous addresses from the IP address of the bootstrap machine. Here is an example of a three-node cluster.
1
2
3
4
5
6
7
8
9
10
[masters]
master0 ip=10.128.0.3
master1 ip=10.128.0.4
master2 ip=10.128.0.5

[agents]
agent[0000:9999]

[bootstrap]
bootstrap
Defining the Agent Nodes
The README file says:
Please make appropriate changes to dcos_gce/group_vars/all. You need to review project, subnet, login_name, bootstrap_public_ip & zone
See the bottom of the README file for a full explanation of the variables. At a minimum, you must set the following variables in the “./group_vars/all” file.
- Project
- Login name
- Bootstrap public IP
- Zone
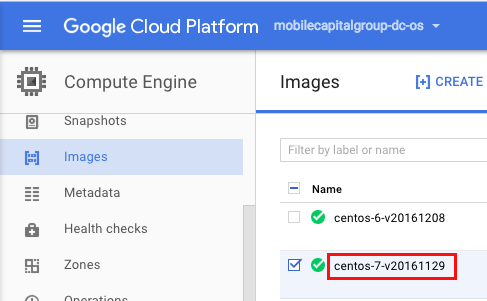
You may also want to tweak the master and agent nodes’ template settings, but it is not required. I changed the “gcloudimage” property to match the Centos 7 image that I found in the Compute Engine –> Image listing.
Install the DC/OS Cluster
You are now ready to install the DC/OS cluster using the Ansible script.
1
ansible-playbook -i hosts install.yml
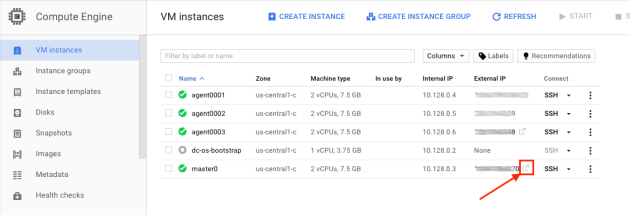
You’ll see some error messages as it attempts to shut down instances that don’t yet exist, and then it will begin creating and configuring the new instance(s). When the script completes, the new instance(s) will appear in the Compute Engine VM Instance list.
Install the Private Agent Nodes
As previously mentioned, I created two private nodes with the following command.
1
2
ansible-playbook -i hosts add_agents.yml \
--extra-vars "start_id=0001 end_id=0002 agent_type=private"
Install the Public Agent Nodes
If you are using the free trial, things get a little tricky here. Your public agent node creation will fail because it puts you over the CPU quota. To get around that limitation, I stopped agent0002 first, and then I created the public node. After making the public node, I shut down the bootstrap machine to free-up one CPU, and then I restarted agent0002. Here is the command that I used.
1
2
ansible-playbook -i hosts add_agents.yml \
--extra-vars "start_id=0003 end_id=0003 agent_type=public"
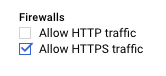
Once the public node is running, edit the instance configuration from the GCE VM Instance page and check the https option (temporarily do the same for the master0 instance).
Open the DC/OS Console
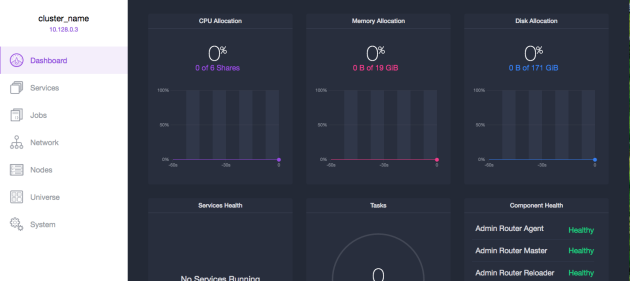
Now we are ready to launch the DC/OS console. Eventually, we will do this with a virtual host pointed at the Marathon load balancer running on the public agent node, but for now, we will open the DC/OS dashboard directly from the master node.
After signing in with the Google account that you used for Google Compute Cloud, you will see something like this.
Installing the Marathon Load Balancer
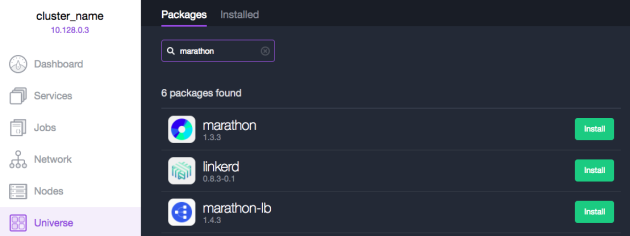
To try it out, let’s install the Marathon Load Balancer on the public agent node. Select Services from the left side menu, click Deploy Service, and then click the link that says install from Universe. When the page opens, search for “marathon.” The search results should look something like this.
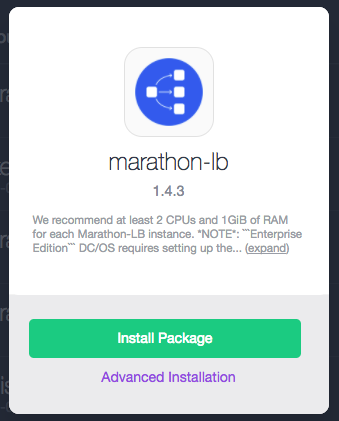
Click Install on the marathon-lb row. When the dialog opens, click Install Package.
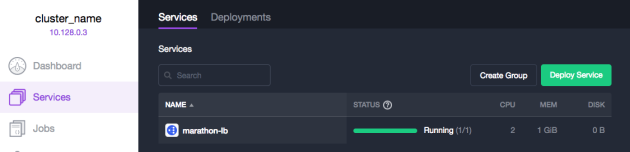
Return to the Services page, and in a moment, you should see this.
You are now ready to begin using DC/OS cluster.