Running Ubuntu on a Raspberry Pi Cluster
When I started using Kubernetes on 32-bit Raspbian I quickly discovered that many Docker images are not compatible. To avoid spending time rebuilding Docker images for linux/amd, I decided to switch to an AMD64 OS. There is an experimental AMD64 version of Raspbian in Beta, but I chose my old friend, Ubuntu.

On October 22, 2020, Canonical released an Ubuntu Desktop image optimized for the Raspberry Pi. What has me most excited me about this release its support for AMD64 on the Raspberry Pi 3 and 4.
Ubuntu Desktop for Raspberry Pi
Setting up Ubuntu
Getting the host ready for the cluster is easy now that it boots directly from the USB drive. All we have to do the following:
- Flash a USB drive with Ubuntu.
- Install the latest updates.
- Set the static IP address
- Change the hostname.
- Add SSH keys for authentication.
Flashing the USB Drive
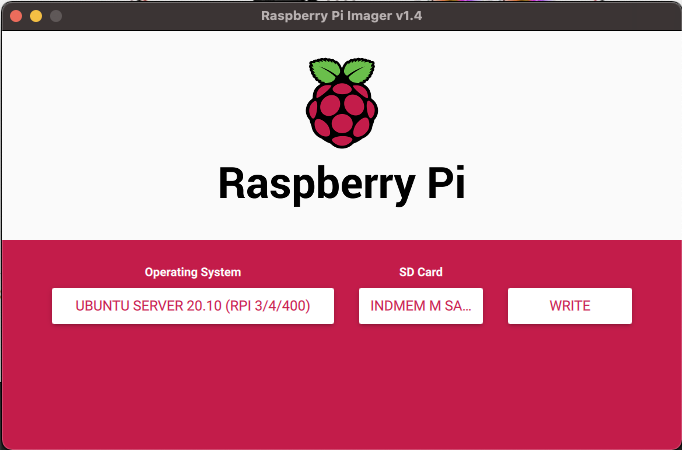
Plug a USB drive into your desktop or laptop. Open the Raspberry Pi Imager and select the distribution you desire. I run my servers headless, so I chose Ubuntu Server 20.10 (RPI 3, 4, 400) for AMD64. Select your USB drive under “SD Card,” and click Write.
Remount the USB drive after it finishes to add the ssh file. Notice, the Ubuntu USB drive mounts as “/Volumes/system-boot” instead of “/Volumes/boot” as the Raspbian image does.
1
touch /Volumes/system-boot/ssh
Boot Ubuntu
Attach the USB drive to the Raspberry Pi and power it up. Give the system a minute to reboot, find the IP address on your network, and connect via ssh. Use “ping -c 2 ubuntu” to get the IP address.
1
ping -c 2 ubuntu
I could not immediately connect with SSH to one of my eight Raspberry Pis, even though I added the ssh file. If this happens to you, attach a monitor and keyboard, login, and reset the password. SSH should work after you reboot.
Update Ubuntu
The first time you connect to Ubuntu as user “ubuntu” with the password “ubuntu,” the system prompts you to change the password. After changing the password, install the latest Ubuntu updates.
1
2
sudo apt update
sudo apt full-upgrade -y
Setting the Static IP
Here is a six-minute video showing how to set a static IP using Netplan.
Setting Static IPs with Netplan
Before setting the static IP, disable cloud-init’s network configuration capabilities by adding this file: /etc/cloud/cloud.cfg.d/99-disable-network-config.cfg. Include the line below in the file.
1
network: {config: disabled}
Make a backup copy of the file “/etc/netplan/50-cloud-init.yaml,” then add the static IP information. Here is how I configured my 50-cloud-init.yaml file.
1
2
3
4
5
6
7
8
9
10
11
12
13
14
15
16
17
18
# This file is generated from information provided by the datasource.  Changes
# to it will not persist across an instance reboot.  To disable cloud-init's
# network configuration capabilities, write a file
# /etc/cloud/cloud.cfg.d/99-disable-network-config.cfg with the following:
# network: {config: disabled}
network:
  version: 2
  ethernets:
    eth0:
        dhcp4: false
        addresses: [192.168.1.10/24]
        gateway4: 192.168.1.1
        nameservers:
          addresses: [192.168.1.1, 8.8.8.8]
        match:
          driver: bcmgenet smsc95xx lan78xx
        optional: true
        set-name: eth0
Validate the YAML file.
1
sudo netplan --debug generate

If the file is valid, apply the changes and reboot; however, if your keyboard is still attached, use it instead of doing this with an ssh connection since the IP address will change.
1
sudo netplan apply
Reboot and connect to the host on its new IP address.
Changing the Host Name
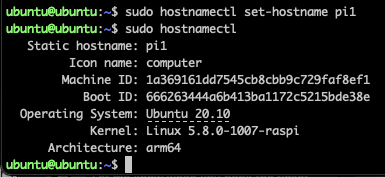
Give the host a unique name. My cluster hostnames are pi1 - pi8. Use the hostnamectl command to make the change.
1
sudo hostnamectl set-hostname pi1
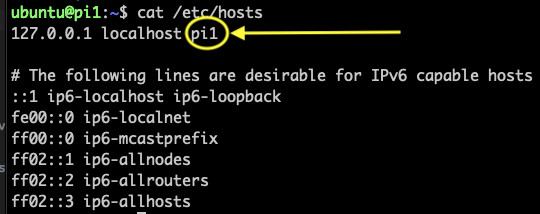
Be sure to add the hostname to your /etc/hosts file too.
Adding your SSH Key for Authentication
Add your computer’s SSH key to the host to avoid having to enter a password when you connect with SSH.
1
ssh-copy-id -i ~/.ssh/id_rsa.pub  ubuntu@pi1
That’s it. We’re now ready to re-install Rancher K3s Kubernetes.
Here is the result:

References
- https://ubuntu.com/tutorials/how-to-install-ubuntu-on-your-raspberry-pi#1-overview
- https://www.youtube.com/watch?v=gJtZOlYR_MM
- https://www.youtube.com/watch?v=0pT4-RcTERU
- Build a Raspberry Pi Desktop with an Ubuntu heart