How to Configure Raspbian Linux
![]()
This article is the second in my series describing how I built a small data center out of Raspberry Pis and the struggles I overcame along the way. The first article, Some Assembly Required, covered choosing parts and assembling the cluster. This article picks up from there with the installation of the operating system on your Raspberry Pis.
Six steps to setting up your OS:
- Pick a Linux distribution
- Flash the OS to a MicroSD card.
- Enable SSH
- Connect, update, and adjust the configuration
- Set the static IP address.
- (optional) Partition the SSD and make it the boot drive
Choosing a Linux Distribution
You have options when it comes to the OS. Here are a few Linux distributions that run on Raspberry Pis.
- Arch Linux Arm
- Centos
- Gentoo
- Kali Linux
- OpenSuse
- Raspbian
- Ubuntu
There are other specialty distributions for media servers, firewalls, etc. Those aren’t appropriate for Kubernetes, but may find a place in your ecosystem, eventually. I briefly ran OpenWrt on one Pi as a firewall, before repurposing that Pi for my cluster.
In the end, I chose Rasbian because of the large community of Raspbian users. If you have an affinity for Centos, Ubuntu, or some other Linux distribution, then that may be the best choice for you.
Creating Boot images
I am running Raspbian headless, with no monitor or keyboard, so I selected the Raspbian Lite version instead of the desktop version. Install an imaging tool, like Raspberry Pi Imager, to flash your MicroSD card.
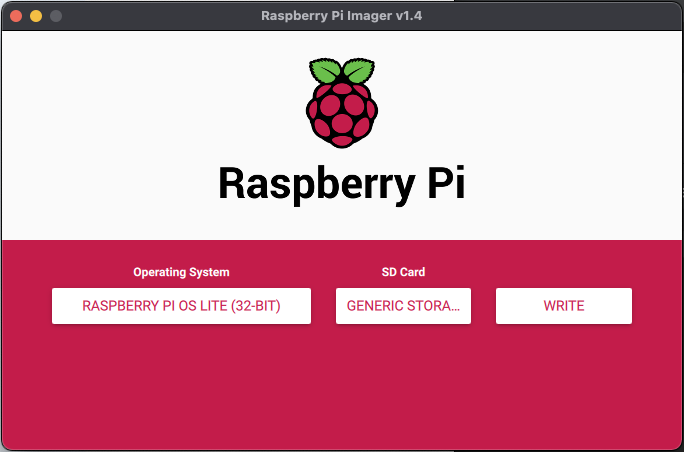
Launch the imaging software, like Etcher, or the Raspberry Pi Imager shown above. Pick the desired Linux image. Insert the MicroSD card and flash it. Remove the MicroSD card when prompted by the imager, then reinsert it and it will be mounted.
Enabling SSH
To enable SSH on the first boot, you must create an empty file named “ssh” on the boot image. The MicroSD card should automatically mount as /Volumes/boot when it is reinserted. Use the “touch” command to create an empty file named “ssh” in the boot directory. On a Mac, the following command creates the “ssh” file.
1
touch /Volumes/boot/ssh
First Boot
There are a number of changes to make after the first boot. Assuming that you are running headless, the first challenge is discovering the DHCP IP address assigned to the Raspberry Pi when it booted.
Find the IP Address
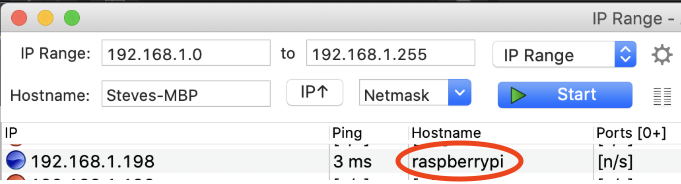
Insert the MicroSD into the Raspberry Pi, power it on, and give it a minute to come online. Angry IP Scanner is a free network scanner to sniff out the IP address on your network. The new device shows up with a hostname of “raspberrypi,” as pictured below.
Open a terminal and use “ssh” to connect to the Raspberry Pi as the “pi” user, for example:
1
ssh pi@192.168.1.196
The default password is “raspberry.” Use “apt” to upgrade Raspbian to current versions.
1
2
sudo apt update
sudo apt full-upgrade -y
Adjust the Configuration
Raspbian has a configuration utility to edit its configuration. We’ll use it to make initial changes. After making this group of changes, we’ll reboot and make sure we can connect to the host. These changes can all be made in a terminal, however, the configuration tool makes it easier if your Linux skills are rusty.
Here’s what we’ll be doing:
- Change User Password
- Localisation Options
- Network Options
Launch the raspi-config utility with this command.
1
sudo raspi-config
The main menu appears:
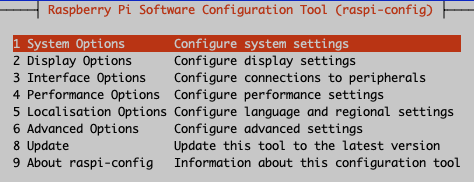
Open the System Options menu.
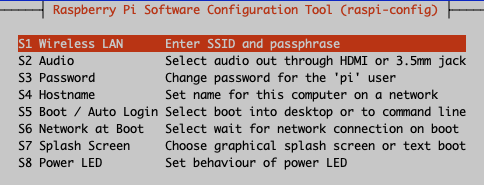
Change User Password
Select the “Change User Password” option by pressing Enter on the top menu item, shown in red above. Enter “OK” when prompted, and then set your own, secure password.
Localization Options
Next, update the localization options.

Change Locale
The default locale is “en_GB.UTF-8 UTF-8.” Change if desired.
Change Time Zone
The default time zone is “London.” Change if desired.
Change Keyboard Layout
It is good to have a keyboard to use in case of SSH problems. A keyboard must be attached in order to use keyboard configuration. I bought a Logitech K400 Plus Wireless Touch TV Keyboard with Easy Media Control and Built-In Touchpad. It has to be mapped correctly or it won’t work when you need it. The keyboard needs to be attached to the Raspberry Pi when you change the configuration so that it can be probed by Raspbian. For me, that meant moving the keyboard’s USB bluetooth connector from one Raspbian Pi to the next as I set up each of them.
Select Change Keyboard Layout and then follow the prompts appropriately for your keyboard model. If the initial menu does not load, ensure that your keyboard is attached. For me, this happened when I moved from one Raspberry Pi to the next but forgot to move the Bluetooth USB connector.
Change the hostname
The last thing we’ll do before rebooting is change the hostname. This makes it possible to distinguish between this Raspberry Pis and others on your network. Return to the main menu and select Network Options.

Select Hostname and change the name from “raspberrypi” to a unique name for your cluster. I named mine “pi1” - “pi6.” Select “yes” when prompted to reboot.
Give the Pi a minute to finish rebooting, then use ssh to reconnect to the host using the same DHCP IP address you originally found on the network with the IP scanner. This time log in using the new password you set above.
Reserved DHCP or Static IP
You’ll want to lock down the Raspberry Pi’s internet address so that it doesn’t change after a shutdown or loss of power. Most home routers have a setting to reserve the DHCP address for a device. That may be the easiest option for you, in which case, you can sign in to your home router and reserve the DHCP address of each Raspberry Pi. Alternatively, you can give each Raspberry Pi a static IP address.
Static IP Addresses
To use static IP addresses, sign in to your home router and find its DHCP address range.

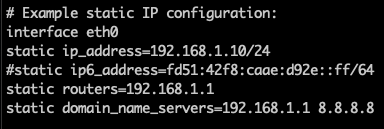
DHCP addresses start at 192.168.1.100 on the router shown above, so addresses below 192.168.1.100 are available to use as static IP addresses. Edit /etc/dhcpcd.conf and find the section named “Example of static IP configuration.” Uncomment the interface line, and change the routers and domain main servers to be the Router’s LAN IPv4 Address pictured above, and set the static IP address to the desired IP. I left the IPv6 address commented out, but you can set that too if you like.
1
2
sudo vi /etc/dhcpcd.conf
sudo reboot
The updated settings should look something like this:
Before connecting to the host you may need to remove the old IP address from your laptop’s ~/.ssh/known_hosts. Edit ~/.ssh/known_hosts, delete the line starting with the Pi’s old DHCP IP address, and save the file.
To test the change, ssh to the host using the new static IP address.
1
ssh pi@192.168.1.10
Booting from SSD
I boot from microSD still because it is easier to access in my cluster rack. If I booted from mSATA, I would have to disassemble my rack to re-image a node.
Repartition the SSD drive.
1
2
sudo fdisk --list # (to find your SSD)
sudo fdisk /dev/sda
Once you launch fdisk perform the following steps:
- “p” to print the partitions. There should be none. If there are any partitions, use “d” to delete them.
- “n” to create a new partition.
- Accept the default, “p” (primary)
- Accept the first sector start.
- Accept the last sector start.
- “w” to write the partition.
Next, use mkfs to format the new partition. Answer “y” when prompted whether to proceed despite a dos partition being found.
1
sudo mkfs.ext4 /dev/sda
When the format operation completes, run the following commands to copy the MicroSD card to the SSD.
1
2
3
4
sudo mkdir /media/external
sudo mount /dev/sda /media/external
cd /media/external
sudo rsync -avx --exclude /media/external / /media/external/
Switching the Boot Drive
The last step in the process is to change the Raspberry Pi to use the micro SATA as the root. Two changes are needed in the /boot/cmdline.txt file:
- Change the root location
- Set the usb-storage.quirks parameter using the vendor id and part number of your USB to SSD converter to prevent it from binding to the “uas” storage driver.
Make a backup before editing /boot/cmdline.txt:
1
sudo cp /boot/cmdline.txt /boot/cmdline.txt.bak
Carefully edit /boot/cmdline.txt and change the root path, “root=/dev/sda,” and append the usb-storage.quirks parameter, i.e. “usb-storage.quirks=045b:0229:u.”
Here is how the cmdline looks before and after editing.
BEFORE
console=serial0,115200 console=tty1 root=PARTUUID=738a4d67-02 rootfstype=ext4 elevator=deadline fsck.repair=yes rootwait
AFTER
console=serial0,115200 console=tty1 root=/dev/sda rootfstype=ext4 elevator=deadline fsck.repair=yes rootwait usb-storage.quirks=045b:0229:u
Reboot and then reconnect to the host and verify the change with the findmnt command.
1
findmnt -n -o SOURCE /
The response from “findmnt” should be “/dev/sda” (or whatever you passed into cmdline.txt).
The Raspberry Pi won’t boot - What do I do?
If you make a mistake in the cmdline.txt file, booting might fail. No worries. That is why you made a backup copy of cmdline.txt before making changes. Remove the MicroSD card from the Pi, pop it into your computer, and restore the original /boot/cmdline.txt file from the backup you created. Problem solved.
Rinse and Repeat
Repeat this process for each Raspberry Pi. The next post will cover simple tips that making working on your Raspberry Pis a pleasure.
Next Steps
In my next article we will cover installing Kubernetes and setting up your cluster.
References
- https://angryip.org
- https://iterm2.com
- https://www.balena.io/etcher
- https://manhattanproducts.us/manhattan-en-mini-multi-card-readerwriter-101981.html
- https://www.electromaker.io/blog/article/12-best-linux-operating-systems-for-the-raspberry-pi
- https://www.raspberrypi.org/documentation/installation/installing-images
- https://www.ionos.com/digitalguide/server/configuration/provide-raspberry-pi-with-a-static-ip-address
- https://www.raspberrypi.org/documentation/remote-access/ssh
- https://www.raspberrypi.org/documentation/raspbian/updating.md
- https://www.youtube.com/watch?v=FM9wuFLufyA
- https://www.youtube.com/watch?v=FM9wuFLufyA